I started writing about tanning larger hides and decided to go back to the basics of getting started with deer hides. This is a place I recommended starting anyway. It is important to get comfortable with the basics first. We gather deer hides in the fall from local hunters. Living in a damp climate, it seems best for us to salt the hides and stack them for storage. It is also possible to “flint “ dry the hides. I have worked with both and depending where you are located, both ways seem to work well. When it is time to start a hide, it will need to be soaked in water in a container - we use rubber garbage cans. Salted hides need only be soaked overnight, though flint dried hides may require a longer soaking.
I have always liked wet scrapping for the finish it gives the hide. Many prefer dry scraping and if you have time constraints [ like a full time job that allows only sporadic time for scraping] dry scrapping may be the best method to pursue. Having said that, after soaking the hide, it should be draped over a beam. We prefer a heavy duty, 6 inch plastic pipe for this. The scraper is made from anything resembling a spoke shave or a draw knife. The flesh side is scraped to remove all flesh and also the membrane closest to the hide. When this is complete, again soak the hide in clean water over night.
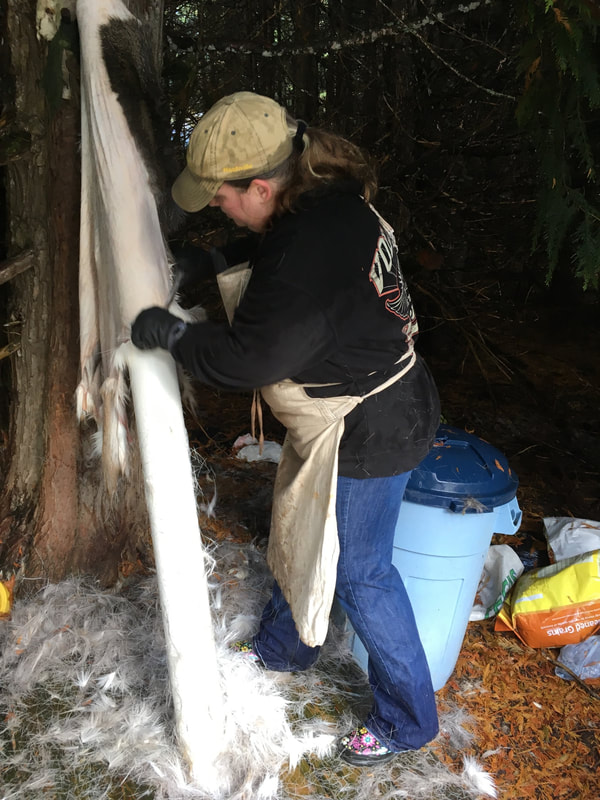
The next day, replace the hide on the beam, with the hair side up. Now it is necessary to remove the hair and also the grain from the hide. The grain consists of the epidermis and also a sort of subepidermis. You will be using a diagonal scraping and cutting motion that will cut through the hair and skin. It will take some experience to be able to discern the epidermis from the hide.
I have always liked wet scrapping for the finish it gives the hide. Many prefer dry scraping and if you have time constraints [ like a full time job that allows only sporadic time for scraping] dry scrapping may be the best method to pursue. Having said that, after soaking the hide, it should be draped over a beam. We prefer a heavy duty, 6 inch plastic pipe for this. The scraper is made from anything resembling a spoke shave or a draw knife. The flesh side is scraped to remove all flesh and also the membrane closest to the hide. When this is complete, again soak the hide in clean water over night.
The next day, replace the hide on the beam, with the hair side up. Now it is necessary to remove the hair and also the grain from the hide. The grain consists of the epidermis and also a sort of subepidermis. You will be using a diagonal scraping and cutting motion that will cut through the hair and skin. It will take some experience to be able to discern the epidermis from the hide.
When the grain has been removed, I like to stretch the hide in a frame to dry. In the summer, it will dry adequately on its own, but during the rest of the year, we place it near the stove in the tanning salon and allow it to dry with a heat source. The next step requires the hide to be very dry.
This next step is scraping the grain side of the hide with the wahinke to remove any remaining grain that was missed when scraping on the beam. Sad but true, not all graining works as good as we want. Nice to know that there is a backup plan. After this last scraping, I remove the hide from the frame, roll it up with tape to hold it, and date it and let it sit to age for at least 3 months. Prefer 6 months if that works. Time breaks down the glue bond in the hide fibers and makes the tanning that much easier and more successful. It is possible to skip the aging process, but you risk the dreaded retanning.
When you are ready to devote some time to the hide, begin the braining process. Sometimes I spend two days to this and sometimes only one. Mix the equivalent of two quarts of cooked brains with two gallons [ maybe a bit more] warm water in a five gallon bucket. Submerge the hide and then begin to work the hide by twisting it on a cross beam. I prefer to keep the solution warm till just after noon and then allow it to cool. If I plan a quick braining of 24 hours, I will twist the hide 7 times the first day. Twist the hide by rolling it into a ring on the cross beam and sliding a stick into the middle and twisting first one direction and then the other while sliding the hide ring around the cross beam. After the twisting [ at least 7 times ] put the hide in the brains and pull it out to a relaxed state, where it can reabsorb the brains. Try to pull out especially tight spots. Allow the hide to set in the solution for an hour or so and the repeat the process.
Next day, you will either work the hide a few more times early in the morning, or work it several more times throughout the day. I heat the brain solution early as I twist the cold hides and the pull the hide out as previously described. By this time there should be a noticeable change in the texture of the hide. If not, you might consider braining an additional day. If you feel confident, twist 3 times this morning and go for it. The final twisting will be to dry the hide as much as possible and will require more twists than previously done. If I can get a small steady stream of solution to flow out of the hide, I continue twisting. If not, on to the next step.
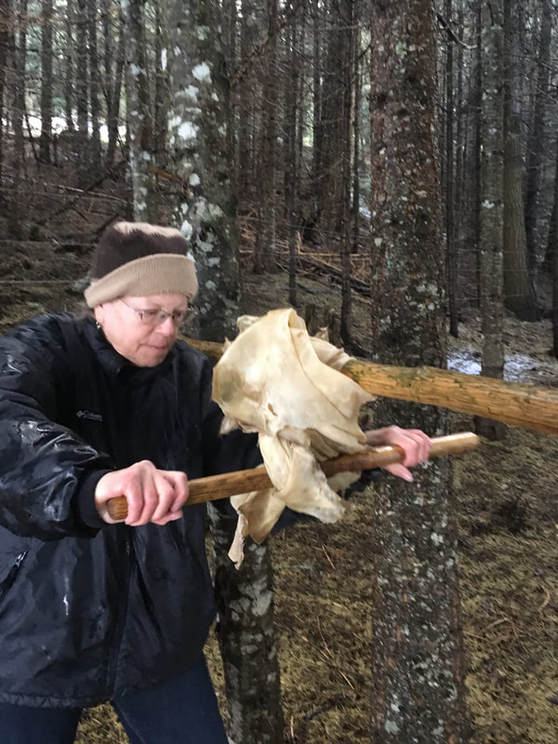
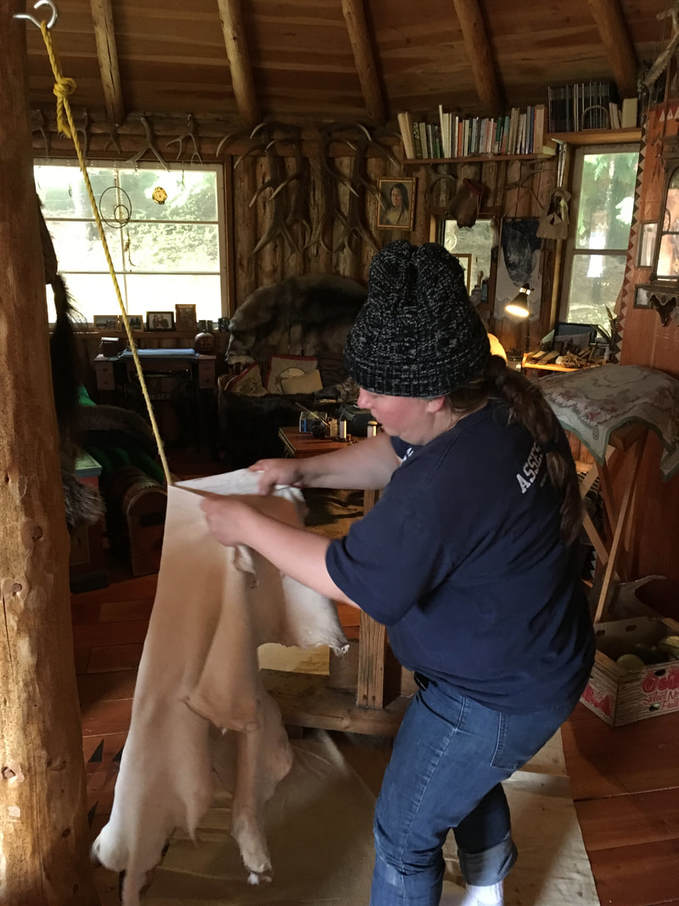
Next I either hang the hide on a line outside to dry, or it can be hung on a line indoors by a heat source. As the hide dries, the fibers will tighten and must be pulled out to maintain flexibility in the hide. I mostly pull the hide on a plastic rope, as it seems to give the most loft. Also I will pull the hide on a staking beam for trouble spots or when the hide is nearly dry. After working on the rope, I stand on one end of the hide and pull up and out with a snap, and the repeat going around the hide. This gives even more loft to the fibers. The hide is then hung on the line to dry again, till the fibers again begin to tighten. The process is repeated until the hide dries completely. That is when there is no detectable coolness in the hide. Be careful not to quit too soon. The fibers will tighten into a hard spot if not kept flexing. It is a totally amazing moment when all of a sudden the hide fibers puff up into permanent loft.
Next I either hang the hide on a line outside to dry, or it can be hung on a line indoors by a heat source. As the hide dries, the fibers will tighten and must be pulled out to maintain flexibility in the hide. I mostly pull the hide on a plastic rope, as it seems to give the most loft. Also I will pull the hide on a staking beam for trouble spots or when the hide is nearly dry. After working on the rope, I stand on one end of the hide and pull up and out with a snap, and the repeat going around the hide. This gives even more loft to the fibers. The hide is then hung on the line to dry again, till the fibers again begin to tighten. The process is repeated until the hide dries completely. That is when there is no detectable coolness in the hide. Be careful not to quit too soon. The fibers will tighten into a hard spot if not kept flexing. It is a totally amazing moment when all of a sudden the hide fibers puff up into permanent loft.
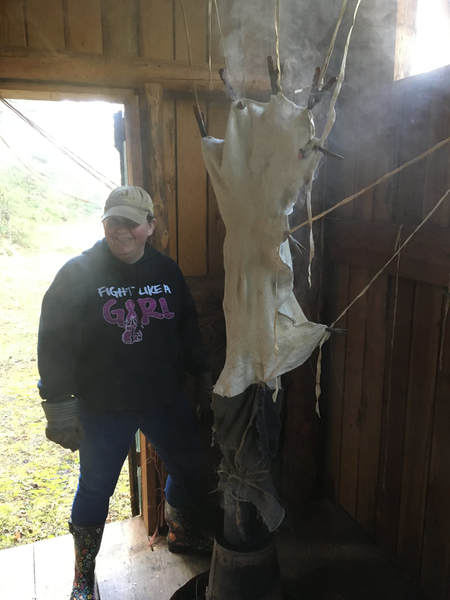
It is a fine thing to sit back and admire this beautiful white hide, but keep in mind that the brains never quit working on the hide, and at some point soon, the hide needs to be smoked to stop this action. I sew two similar hides together with a cloth sleeve attached at the neck end of the hides. Then suspend the hides over the smoker with a smoldering fire and tie the sleeves to the pipe.
My smoker is made of a five gallon metal bucket that is the fire pot, and an inverted two and a half gallon bucket with a flange attached to the bottom and a six inch stove pipe coming out the top as the lid. Build a fire in the bottom bucket, then add lots of chunks of rotten wood, get them going, then put the top on and smother the fire by covering the pipe for a bit. It doesn’t take too long to blow the smoke through the hide fibers with this method. When the smoke slows down noticeably, remove the hide from the top of the smoker. Recharge the fire and turn the hide inside out. Then, smoke the other side.
That’s it. You have a beautiful brain tanned deer hide.
Enjoy.